What Is Konad?
Konad is a brand/company that has created a unique process (to the nail world at least) for producing nail art. It consists of special polish, metal plates, and a stamper. Much like offset printing, Konad works by "inking" your image plate, applying pressure with a rubber stamp to lift the design from the grooves, and then transfering it onto your nail.
What You Need:
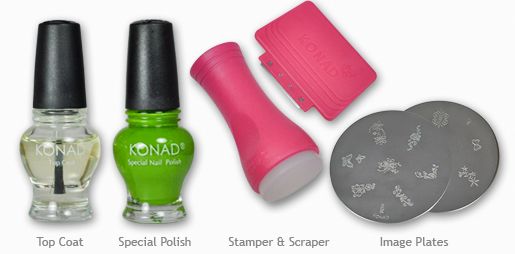
You Need [SHOWN ABOVE]: Konad Top Coat (for sealing your design), Konad Special Polish (Made especially for stamping. Applies opaque even though it's only a thin layer), Konad Stamper, Konad Scraper, and Konad Image Plates (off-brand plates work as well, a.k.a. "Fauxnad") You ALSO Need [Stuff you probably already have]: cotton balls and/or Qtips, acetone, paper towels, and a tiny paintbrush (for cleanup) |
How It Works:
This entire process should be done as quickly as you can manage. The "Special" polish dries very fast so you want to get it out of your plate and onto your nail as soon as possible.
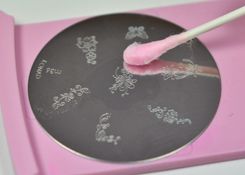
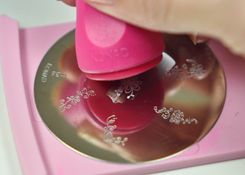
STEP 1} Clean your desired image plate with acetone (or regular nail polish remover) to remove oils/lint from its surface. Let dry completely. **The pink plate holder is not necessary to have. I bought it because it looked fun
STEP 2} Apply a drop of Konad's "special" polish to the design of your choice. Brush to completely cover it. You don't need a lot, just enough to fill the grooves of the image.
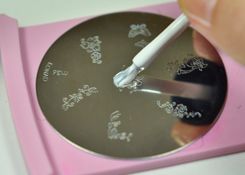
STEP 3} With your Konad scraper at a 45 degree angle, lightly pass over the design to remove excess polish from the top of your plate. You should now see your polish-filled image. Set your scraper to the side.
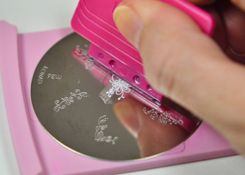
STEP 4} Grab your rubber scraper and quickly roll it over the design to pull the polish out of the image plate. Roll only ONCE, from one edge of your stamper to the other.
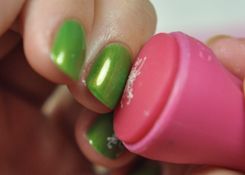
STEP 5} Time to stamp your nail! Hold your nail and stamper eye-level so you can see what you are doing. Just like you did to pick up the polish, you are going to roll the stamper to release the polish onto your nail. Do NOT roll back-and-forth. Don't press too hard... and don't forget this is fun!
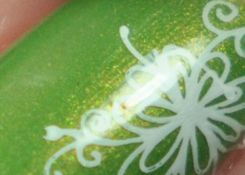
STEP 6} Wait a couple minutes and then use Konad's topcoat to seal your work. Lightly brush the topcoat over your nails. Try to cover it in as little strokes as possible. (You can try other topcoats but I've heard some cause smearing. Test first!)
STEP 2} Apply a drop of Konad's "special" polish to the design of your choice. Brush to completely cover it. You don't need a lot, just enough to fill the grooves of the image.
STEP 3} With your Konad scraper at a 45 degree angle, lightly pass over the design to remove excess polish from the top of your plate. You should now see your polish-filled image. Set your scraper to the side.
STEP 4} Grab your rubber scraper and quickly roll it over the design to pull the polish out of the image plate. Roll only ONCE, from one edge of your stamper to the other.
STEP 5} Time to stamp your nail! Hold your nail and stamper eye-level so you can see what you are doing. Just like you did to pick up the polish, you are going to roll the stamper to release the polish onto your nail. Do NOT roll back-and-forth. Don't press too hard... and don't forget this is fun!
STEP 6} Wait a couple minutes and then use Konad's topcoat to seal your work. Lightly brush the topcoat over your nails. Try to cover it in as little strokes as possible. (You can try other topcoats but I've heard some cause smearing. Test first!)
Keep in mind, this takes practice! Believe me. My first attempt was not pretty! Whatever you do, do not give up :) Try stamping over an old manicure to get the hang of it. Then you don't have to worry about ruining perfect nails! |
I purchased all of my Konad Supplies from OCNailArt. They are very pleasant to work with! |
Fantastic tutorial. Thanks!!
ReplyDeleteFor a konad rookie such as myself, still thinking about trying Konad for the first time, this post is solid gold! I'll be defintively checking this post when I start konading, thanks for making it so clear. :)
ReplyDeleteGreat tutorial! I have the little pink base and I think it holds on to the plate and keeps it from moving around (and with the hole in the base, it's easier to grab the plate). Is that green on your nails Zoya Midori?
ReplyDeleteI never use a konad top coat. I use either seche vite or zoya top coat and my design always last.
ReplyDeleteThank you so much! I am new to the nail polish world and I often see people with Konads! But I never knew what is was! Thanks, really! :)
ReplyDeletewww.beautifullydefined.blogspot.com
Glad to have you back! I thought you quit! You always make me laugh (few nailpolish blogs are funny). What's the green color you're wearing? It's GORGEOUS.
ReplyDeleteAwesome post! :)
ReplyDeleteI find with the scraper I end up with gobs of polish everywhere. I prefer the ENOS stampers as I don't have to scrap and the design is already on the stamper.
ReplyDeleteWeehooo I'm very glad you are back!! :)
ReplyDeleteThanks for the tute but isn't the green "specail" polish supposed to be used for stamping only, not for actually painting the nail. By your pictures it looks like you painted your nails with the "specail polish" and stamped with some other polish. Isn't konad fun, though? I use it when I don't have time to do hand drawn nail art. Thanks again.
ReplyDeleteThank you for this tut.
ReplyDeleteI need to practice :) ... and find some more lovely plates!
I love Konad I'm addicted to it for more then 3 years now :)
ReplyDeleteThanks for the step-by-step :)
ReplyDeletenice tutorial! i have the plate holder too. your right, it's not really necessary, but i got mine just because it's pink! haha!
ReplyDeletenew follower here=)
Quick question that isn't related to this post. What are some of your fav. electric, bright, tealish blue colors? I am on the hunt for this color and I don't even know where to start lol. thanks in advance<33
ReplyDeleteJust a general note, can you do more hand shots when you do a nail design? I find it very helpful to gage what the final look is like in real life, and what it looks like to other people. Great blog!
ReplyDeleteOmg! Why did you stop updating? Are you going to be back?
ReplyDeleteI LOVE my Konad! Best invention ever! I just added you to my blogroll. Come check me out over at www.cherishscupoftea.blogspot.com
ReplyDeleteI miss your updates! & Charlie! Please post again soon! <33
ReplyDeleteThis post is very informative. Precise and direct. But really, my experience is konad is trial and error....More error than success but I am having fun.....
ReplyDeleteThis post is very comprehensive. Congrats.....Konad is fun and my own experience is quite an adventure.....miss or hit....But always fun. Practice practice is the key.....
ReplyDeleteMy first time of stamping was terrible ;D
ReplyDeletebut now its like riding bicycle :)
Hi! Love the blog and I'm going. If you want to go through my blog, I'll be very happy.
ReplyDeleteKonad love!
Kisses!
www.esmaltequeuso.blogspot.com
I love your work! Could you please do a video tutorial on how to do some of these designs or how to get that perfect nail polish look! Do you have a youtube site?
ReplyDeleteCould you do a video tutorial for some of your designs. And one on how to get that perfect polish look! yours look so clean and professional! Love Love Love your work
ReplyDeletedear phd,
ReplyDeleteit's been 4 months, are you OK?
<3 deniz
Thanks for the info!! I'm getting my plates today in the mail!!!
ReplyDeleteI can never seem to make Konad work for me, maybe this will help! Following. :)
ReplyDeleteVery helpful post! I love Konad :)
ReplyDeletehttp://putbeautytowords.blogspot.com/
Great tutorial! I hope you'll be back soon :)
ReplyDeleteI LOVE konad! Maybe you can check out my nailblog? I am a newbeginner, but I get better all the time! x)
ReplyDeleteLots of hugs from Thea <3
http://hverdagsnegler.blogspot.com